01 January 2009

beads.3

So, where can you find cool beads to embellish your needlework? Here are some ideas:

• Bead shops. With the recent popularity of jewelrymaking, bead shops have popped up in most cities and they're great places to see (and touch) beads in person. A bit overwhelming perhaps but, if you can survive a fabric store, you can handle this, too!

• Craft, hobby, and fabric stores. JoAnn Fabrics, Michaels, Hobby Lobby, and A.C. Moore all have jewelrymaking sections, usually an aisle or two of beads and supplies. Nothing too fancy or out of the ordinary but a good selection of basics. I bought those tiny pearl beads that I used for the second Beads post at A.C. Moore.

• Online. There are tons of online bead shops, some that are offshoots of retail shops and some that have catalogs as well. Here are some popular ones:

Shipwreck Beads—huge selection including 2,800 styles and colors of seed beads
Fire Mountain Gems—celebrating their 35th anniversary/free catalog available
Bead Studio—there's also a retail shop in Ashland, OR
Beadstore—beads and embellishments from around the world
Happy Mango Beads—handcrafted, fair-trade beads from around the world

• Bead shows. These take place in various cities around the country (links below) and are mostly for serious jewelry artists. Lots of exotic stones, African trade beads, Middle Eastern and Indian metal charms. I've been to The Whole Bead Show, held in the ballroom of the Hotel Pennsylvania in New York City, and it was incredible. I've never seen so many cool things in one place before.
Bead and Button Show—an annual show in Milwaukee hosted by Bead and Button Magazine

Lapidary Journal has a show list here.

• Ebay. You know you can find anything and everything here. Search in:
Crafts>Bead Art>Craft Beads
Crafts>Bead Art>Charms
Jewelry & Watches>Loose Beads

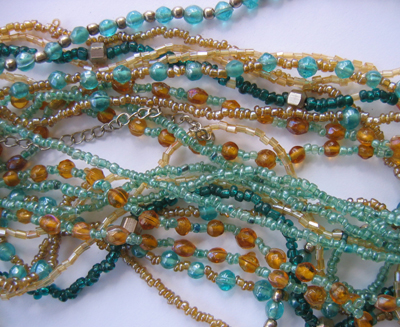
• Vintage. Don't forget to look for vintage jewelry at flea markets and antique malls. You want pieces that have lots of beads and that don't cost too much. I found this 70s multi-strand necklace at a local shop for $3—just look at all those beads!

vintage beads

Feel free to share your sources in the comments.

beads.2

In the first beads post I showed you the basics of attaching beads to your work. But how do you attach objects with a single hole? And how do you make those cool hanging fringes like on the gray purse I showed in that first post? By sewing one bead on top of another, of course!


For sequins (like on the bird holiday ornament shown above) or for a button with one hole (my examples are German pink glass cup-shaped flowers) lay the object on the fabric, come up through the hole with your needle, slip a small bead (or pearl in this case) onto the needle, then go back down through the hole—the object is held in position by the bead.


You can attach anything flat this way—a cutout felt flower, a small metal washer, a length of ribbon (using a row of beads)—anything that isn't too thick and that you can make a hole in. All you need to worry about is that the top bead is large enough to not fall back down the hole in the object underneath. Sequins aren't a problem because the holes are tiny but if you decide to attach objects you'll need to consider this.

To make fringe, thread the beads onto your needle, pull your thread through, go around the last bead, then back through the others. Secure your thread back at the place where you started.


This is kind of like using a head pin in jewelrymaking with your top bead taking the place of the metal cap. And you can use a bead that's smaller than the others for your end bead—your thread will be less noticeable that way. Make sure you use a nice strong thread for this technique—you want flexibility and "swing" without your fringe breaking and scattering beads everywhere.

One more post about beads will be coming shortly—with some ideas about where to find cool ones!

beads.1

Embroidery looks great all by itself, but sometimes you want a little extra something. Using beads is a great way to add texture and sparkle. Some of you know that I collect decorative purses—mostly vintage silver mesh and art deco beaded ones—but I also have a few more modern ones that use beads decoratively. Here are a few examples.

Anthropologie gray satin pleated purse with silvery beads.


Chinese drawstring purse with chain stitch embroidery and beads.


Now, for the how-to. You'll want to use thread (embroidery floss is fine, too) that is the same color as the beads or the same color as your fabric. I'm not doing that here because I want you to be able to see the stitches clearly in the pictures. And test first to make sure your needle is thin enough to pass through the bead opening.

Start by making a small knot at one end of your thread, or work several small stitches on top of one another on the back side of your fabric. Bring your needle to the right side and pick up a bead. Slide it down until it rests on the fabric surface.


Bring your needle to the back a short distance away—with your spacing equal to or slightly less than the width or height of the bead.


If you're sewing one bead, that's it. Knot or weave your thread in on the back and you're done.


For more beads (a cluster of three like the gray purse shown above, or a sprinkling over your fabric surface) just keep going, but make sure you don't leave too much space between your first and next bead—you don't want long threads on the back. And it's probably a good idea if the beads are spaced apart to take an extra stitch (or two) through the bead hole.

Use this same technique to attach charms or other items that have a ring or loop at the top.


You can also make a short row by threading several beads onto your thread and tacking it down at the end.


This post is already pretty long so I'll continue in a second part and show how to attach sequins (or other objects that have a single hole) and also how to make fringe—like on that gray purse shown above.

What got me thinking about this subject was a book I found at the library called Fashion Bead Embroidery by Natalie Giltsoff that had some great (although dated—it was published in 1971) ideas, including beaded bags, fabric-covered buttons, gloves, shoes, and dress necklines. There are tons of more modern books, too—just type in bead embroidery at Amazon and you'll find more than 600 of them! If anyone has a favorite resource, please share in the comments.

27 August 2008

interlaced running stitch

I found this stitch in Erica Wilson's Embroidery Book at the library (published in 1973 and a good reference book if you can find a copy). It's a compound stitch that uses running stitch as the base and then weaves another color of thread through it. An easy stitch that's perfect for me to cover this week since I'm busy with my houseguests.

So start with a line of running stitch, each stitch the same width and evenly spaced apart. Complete this to whatever length your finished line will be and finish off the end on the back. Rethread your needle with a second color and come up underneath and in the middle of the first stitch.


Weave this thread through the line of stitches, going over and under, without piercing the fabric.


When you come to the end, weave under the final stitch, then turn and come back in the opposite direction.


Go over and under each stitch again, making sure not to pierce the fabric.


When you come back to the beginning take your thread to the back in the same place where it first emerged and finish off.


Here's what it looks like with widely-spaced and smaller, more closely spaced base stitches.


You could use the same color thread for both and have a simple chain but I think it provides more possibilities using two colors.

16 July 2008

chicken scratch

Chicken scratch embroidery (also called snowflaking, Tenneriffe lace, or Amish embroidery) is a form of cross-stitch that is done on gingham fabric using the edges of the squares instead of counting threads. It's usually done with white thread so the end result looks like lace. You can also work the designs with thread that is the same color as your gingham—this is called reverse chicken scratch.

The technique uses three simple stitches—the double cross-stitch, the straight running stitch, and the woven circle stitch. I'll show you all three.

Double Cross Stitch
Work a cross stitch from corner to corner in one square of the gingham. If you're using the darker color for reverse chicken scratch (in this case, red), work in the white blocks.


Then work a straight cross stitch over this. Remember to do your cross stitches in the same order so all your threads go in the same direction.


Running Stitch
I talked about running stitch a while ago and this is essentially the same thing. Working from right to left, take a stitch from one side of each gingham square to the other, skimming under the squares in between.


Woven Circle Stitch
Bring your needle up in the same hole as the running stitch. Slip the needle under the running stitches to form a circle.


Go around the circle a second time, then insert your needle in the same hole that you started from.


Here's what they look like together.


These pictures are of a lavender gingham apron that's for sale on my website. Very simple design with rows of chicken scratch on the waistband, along the top of the pocket, and above the hem. It's exactly the same design I showed above; just repeat to form rows.

lavender gingham apron

chicken scratch

To read more about chicken scratch embroidery and to see some different designs check out:

Feeling Stitchy post on Chicken Scratch.
LindaB's Flickr set with beautiful examples from her vintage apron collection.
General instructions including a pattern for a heart-shaped motif.
Some background and a pattern for an eight-pointed star.

19 June 2007

braid stitch

When I sat down to work on and photograph this stitch I ran into all sorts of problems. I'm embarrassed to say that I couldn't figure out how to do it, either from the written directions or from the drawings. Maybe I was overtired—who knows? But then I found the stitch in another book—one with photos—and I "got" it. And that's why I show you step-by-step photos. It's not that these stitches are hard to do. In fact, once you've figured them out and completed a few inches of embroidery, you'll laugh at yourself and wonder what the problem was. Just what I'm doing right now :)

So, without further ado, I present the Braid stitch. You'll want to work with two parallel drawn lines for this to keep the top and bottom aligned and you'll work from right to left.

Here's the original drawing, which doesn't look so bad now (but oh, those written directions made no sense at all)


Start by bringing your thread to the front on the bottom line. Then make a loop like this (first loop the thread to the left, then flip the loop over from right to left). This is an awkward motion and didn't come automatically to me for some time.


Holding the loop with your thumb (not shown in photo), take a long vertical stitch from the top line to the bottom. Keep the threads out of the way exactly as shown.


Now loop the working thread from right to left under the tip of the needle.


Pull the loop tightly around the needle.


Pull the thread through with a downward motion, holding the loop down lightly with your thumb. Be a little careful here to not pull too tightly. There's nothing holding the top loop, it's just lying alongside that top thread. If you pull too much it makes a real mess (trust me on this one).


Make a second loop like you did in the first step.


Again insert the needle through the loop, making a stitch from the top to the bottom line. Loop the thread under the needle as you did before. Pull the thread through to complete the second stitch.


Continue working until you reach the end of your line.


Here's what it looks like.


You may be wondering why my thread looks different this time. It's because I'm using something called perle cotton. Perle cotton is a tightly twisted pure cotton thread that doesn't get divided into strands when used. It was recommended for this stitch—for it's textural qualities—so I decided to try it. It comes in four weights and mine is perhaps too fine for this stitch. That's all I had on hand but I think a heavier weight would have worked better. It was also recommended that you work this stitch fairly small with the stitches close together. I didn't do either but it would have been impossible to show what was going on at a smaller size. As with all stitches, varying the length and spacing will give you different looks. Learn the basic steps first and then experiment to get the look you like.