Dear readers who attempt to leave comments about my blog linking to your embroidery digitizing business, you've totally missed the point. This blog is about hand embroidery, the old-fashioned kind. It's not done by machine, it isn't fast, it isn't perfect. And that's exactly how we like it. Years ago I switched to reviewing all comments before they post and this is exactly why. I will mark comments that link to businesses as spam every time. My blog, my rules.
16 September 2024
05 August 2012
get thee to Portland
I first became aware of Susie Ghahremani's illustration work when I was an art director—I think she may have sent a postcard in hopes that I'd find an assignment for her in the magazine I worked for. I very much regret that that didn't happen because we might have become friends sooner than we did. We met again a few years later through her online business Boy Girl Party. She's an award-winning artist from San Diego, CA whose work combines joyful imagery with highly intricate hand-painted patterns. Her love of nature, music, and textiles come together in each painting and illustration, delivered with the detail and soul of a crafter. You can read more about her at boygirlparty.com.
So, why am I writing about an illustrator on a blog about needlework? Because she's going to be offering embroidery patterns based on some of her drawings, that's why. For now the very limited edition patterns are only available for purchase at her shows. And there's one coming up next weekend!
Susie's agreed to take a few minutes out of her busy schedule to answer a few questions for us about the show and the patterns, some of which you'll see illustrating this post.
Tell us about your upcoming show.
The show is titled "Clear Skies and Cloudy Days" and it runs from August 10th - September 2nd at Land Gallery in Portland, OR. It includes more than 100 of my latest works—paintings, drawings and mixed media such as cross-stitch.
I'll be flying up to Portland this week for the opening reception on Friday from 6-9 pm. Land Gallery, located in the historic Mississippi neighborhood, is run by the owners of the iconic indie shopping website buyolympia.com and features new, original artwork from a fantastic stable of upcoming and established independent artists.
(Land Gallery, 3925 N. Mississippi Ave., Portland, OR 97227 (503) 451-0689)
What inspired you to do embroidery patterns (a great idea, by the way)?
Thanks! Years ago, I used to host craft nights at my house with my girlfriends, and my friend Irene Stone (http://irenejoy.etsy.com) would always bring over her cross-stitch projects (based on incredible patterns she would make herself). Watching her work on them (and being the lucky recipient of some of her handiwork!), I thought to myself how it's a nearly extinct craft, and how I'd enjoy the irony of bringing extinct animals to life with that medium. I asked her if she'd want to collaborate on a series just for fun (my drawings, her stitching) and that's how it began! At first we only did a dodo bird, sabre toothed tiger and woolly mammoth (which are the first three patterns we're releasing) but now (two years later) we have more than 20 x-stitch-extinct animals in the works, ten of which Irene has stitched already.
After we collaborated on a few of the finished pieces, we decided it would be fun to share the patterns with others so they could reach a wider audience.
At the Portland show, I'll be showing all the drawings from this project and 10 of the finished cross-stitched pieces in addition to over 100 other paintings and drawings by me.
And the patterns are part of a kit; what’s included in that?
Basic instructions, an easy-to-follow color-based pattern printed in large format, neatly wound spools of the necessary embroidery floss, and a license for personal use of the pattern. Each sells for $14.
I first saw a picture of the dodo pattern on your Facebook page (and loved it so much that I knew I had to write about it). What are the other endangered animals?
The kits include just the Dodo, Sabre Toothed Tiger, and Woolly Mammoth. But the finished pieces include the Baiji Dolphin (two versions), Boobook Owl, T-Rex, Thylacine, Great Auk, and Short Faced Bear.
People can pick up the EXTREMELY limited edition patterns at the show or by contacting the gallery directly; the drawings and the finished cross stitched pieces will also be for sale.
Thanks, Susie! She tells me that she’d like to eventually offer the patterns for sale on her website and has promised to let me know so I can pass along that info to you. For now, you’ll need to get yourself to this show if you’re in driving distance of Portland. I so wish it wasn't a week-long road trip for me :)
22 May 2012
who doesn't love puppies?
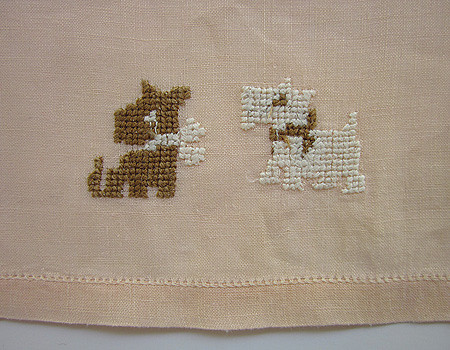
I found this sweet peach-colored linen towel recently at an antique mall. The bottom edge features two dogs (Scotties, maybe) embroidered in brown and white using very small cross stitches—almost, but not quite, petit point.
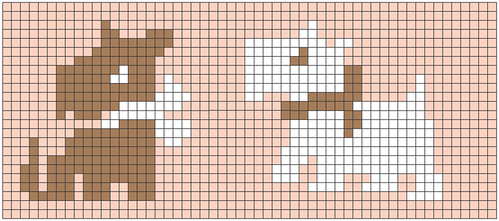
You can probably figure out the design yourself—it's pretty simple—but I made it into a charted pattern for you. Click through to the Flickr page for a larger version.
19 May 2012
alternate (or double) stem stitch
One of my readers emailed me to ask about a stitch called double stem stitch. And I checked all my embroidery books and didn't come up with anything. But many stitches are called by different names depending on where they originated and are used, so I think I may have found it but named alternate stem stitch. Feel free to correct me if I'm wrong.
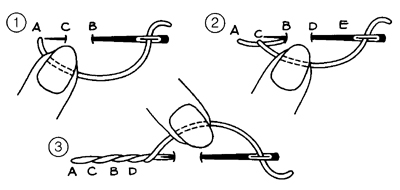
So, as a quick refresher, stem and outline stitches are done the same way except that stem stitch holds the thread below the needle (diagrams 1 and 2) and outline above (3). Alternate stem stitch is going to use both of these methods combined.
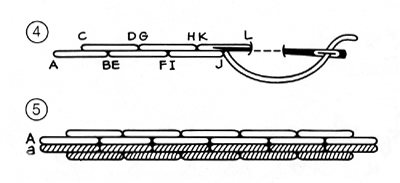
Work along a line as for stem stitch but, instead of holding the thread below the needle for every stitch, hold it alternately below for the first stitch (ABC), above for the second (CDB), below for the third (EGF) and so on. See the first diagram (4).
The second diagram (5) shows what happens when you work two rows closely together. Start the second row at "a", holding the thread above for the first stitch, below for the second, etc.
Diagrams from Stitches with Variations: A Handbook of Basic Stitches by Jacqueline Enthoven. ©1976 Sunset Designs. Many thanks to Patricia in NJ (my 'personal shopper') for sending me the book!
10 September 2011
floral monograms
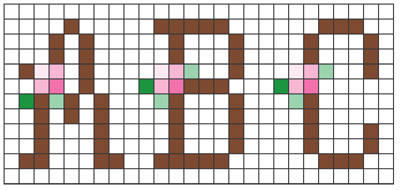
I found a very old embroidery booklet at an antique mall during the summer—Alphabets and Monograms by Anne Orr. Sixteen pages of designs, some of which have floral details like the one shown here. I've been redoing the designs into modern charts with the hope of reproducing the booklet. Not quite ready yet but I thought I'd share one of the designs with you.
I'm slightly embarrassed that I haven't posted anything since April - yikes! But I've been so busy with my business this summer that I haven't had time to post. So, the free monogram chart is my way of making it up to you (click through the small chart detail above to my Flickr page where you'll find a large size chart of the entire alphabet). Enjoy!
29 April 2011
an easy (really) crochet edging
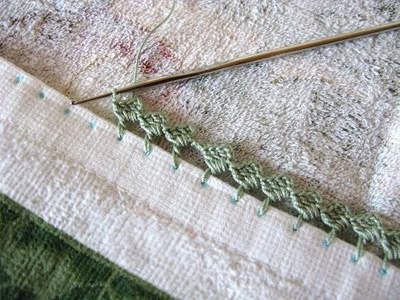
I have several stamped-for-embroidery pillowcases that already have the holes along the edge for attaching crochet. I just never knew how to go about attaching it. Well, I sort of knew but, having never crocheted before and finding most instructions daunting, I've never even tried.
But, there may be hope for me yet. Kathleen Mower, on her blog Miss Abigail's Hope Chest, has a tutorial for an easy zig-zag crocheted edging that might be the perfect thing to finish my project. Perhaps yours, too. She added hers to a towel (and it took just 30 minutes!), but it should work equally well for pillowcases. If you want to try this, she suggests skipping over some of the holes, choosing ones that are spaced about 3/8-inch apart; otherwise there won't be enough room for the little diamond shapes.
Labels:
crochet edging
10 April 2011
Book Review: Embroidered Flora & Fauna
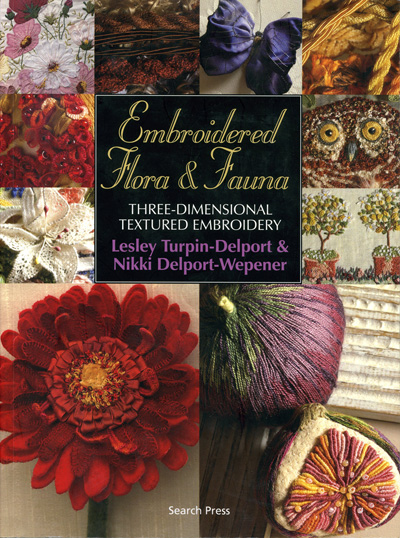
This lovely book was first published in 2007 in South Africa, again in Great Britain in 2008, and reprinted twice more in 2009. Which tells you something of it's popularity with lovers of needlework. And the projects are simply stunning. You'll get plenty of basics as to techniques and materials, too, but it's probably not for the beginning embroiderer. Think of it as a next step when you feel the need to add some dimension and texture to your work.
And three-dimension and texture are what this book is all about. Techniques include fabric manipulation, wire-edged applique, barbola (unwired stumpwork), needle lace on wire, trapunto quilting, working with felt and ribbon, beading, and metallic threads. Used together as mixed media, which you'll see in the projects that follow, they provide endless ways of creating realistic flora and fauna.
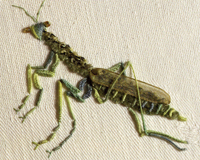
The projects, which are all inspired by the natural world, are categorized by color inspiration. Red, for example, features projects for three-dimensional felt gerbera daisies and wired applique bougainvilla; green has a nesting weaver bird incorporating actual feathers and a praying mantis that uses organza ribbon for his transparent wing. There are flowers, butterflies, insects, and birds and even a project for a realistic fig made from felt, yarn and beads (see the book cover for a close-up of this). All projects are illustrated with gorgeous photos of the finished piece and many have close-up views as well so you can really see the fine detail.
The book finishes with a section of black-and-white stitch diagrams and patterns for the projects that require them.
I found my copy at my local fabric store but it's also available on Amazon (and if you want to purchase a copy, please click through the link included above).
Subscribe to:
Posts (Atom)